


Run Production-Grade Nextflow Pipelines Using AWS Batch
Run production-grade Nextflow pipelines using AWS Batch with minimal setup. No unnecessary complexity or orchestration headaches—just focus on building and running your pipelines.
What Is Nextflow?
Before exploring why AWS Batch works well with Nextflow, it is important to understand what Nextflow actually is.
Nextflow is a workflow orchestration engine designed for data-intensive computational pipelines. It acts as a sophisticated task manager that can:
- Chain multiple steps together: take raw data, process it through analysis tools, and generate reports in a defined sequence.
- Handle dependencies automatically: Task B will not start until Task A finishes successfully.
- Parallelize workloads: if you have 100 samples to analyze, Nextflow can process them concurrently when sufficient resources are available.
- Resume from failures: if a pipeline fails at step five of ten, it can resume from the failed step instead of restarting from the beginning.
Originally built for genomics, where a single analysis may contain more than 20 steps and run for several days, Nextflow is now widely used for data science, machine-learning pipelines, and other complex data-processing workloads.
One of its most important features is container support. Nextflow can use Docker and other container technologies for each task, helping ensure that an analysis runs consistently on a laptop, an EC2 instance, or a cloud compute cluster.
Why AWS Batch for Nextflow?
AWS Batch is a managed service for running batch-computing workloads.
You define what needs to be computed, while AWS handles infrastructure provisioning, job queuing, scaling, scheduling, and cleanup.
AWS Batch pairs well with Nextflow because it provides:
- Hands-off infrastructure: no servers to patch and no compute clusters to maintain.
- Automatic scaling: compute instances start when jobs arrive and stop when they are no longer needed.
- Flexible pricing: use On-Demand instances for predictable availability or Spot Instances for potential cost savings.
- Built-in monitoring: Amazon CloudWatch can track jobs, logs, and infrastructure activity.
- Simplified architecture: fewer infrastructure components mean fewer operational failure points.
Compared with operating a self-managed compute cluster, AWS Batch removes much of the infrastructure and capacity-management burden.
How It Works
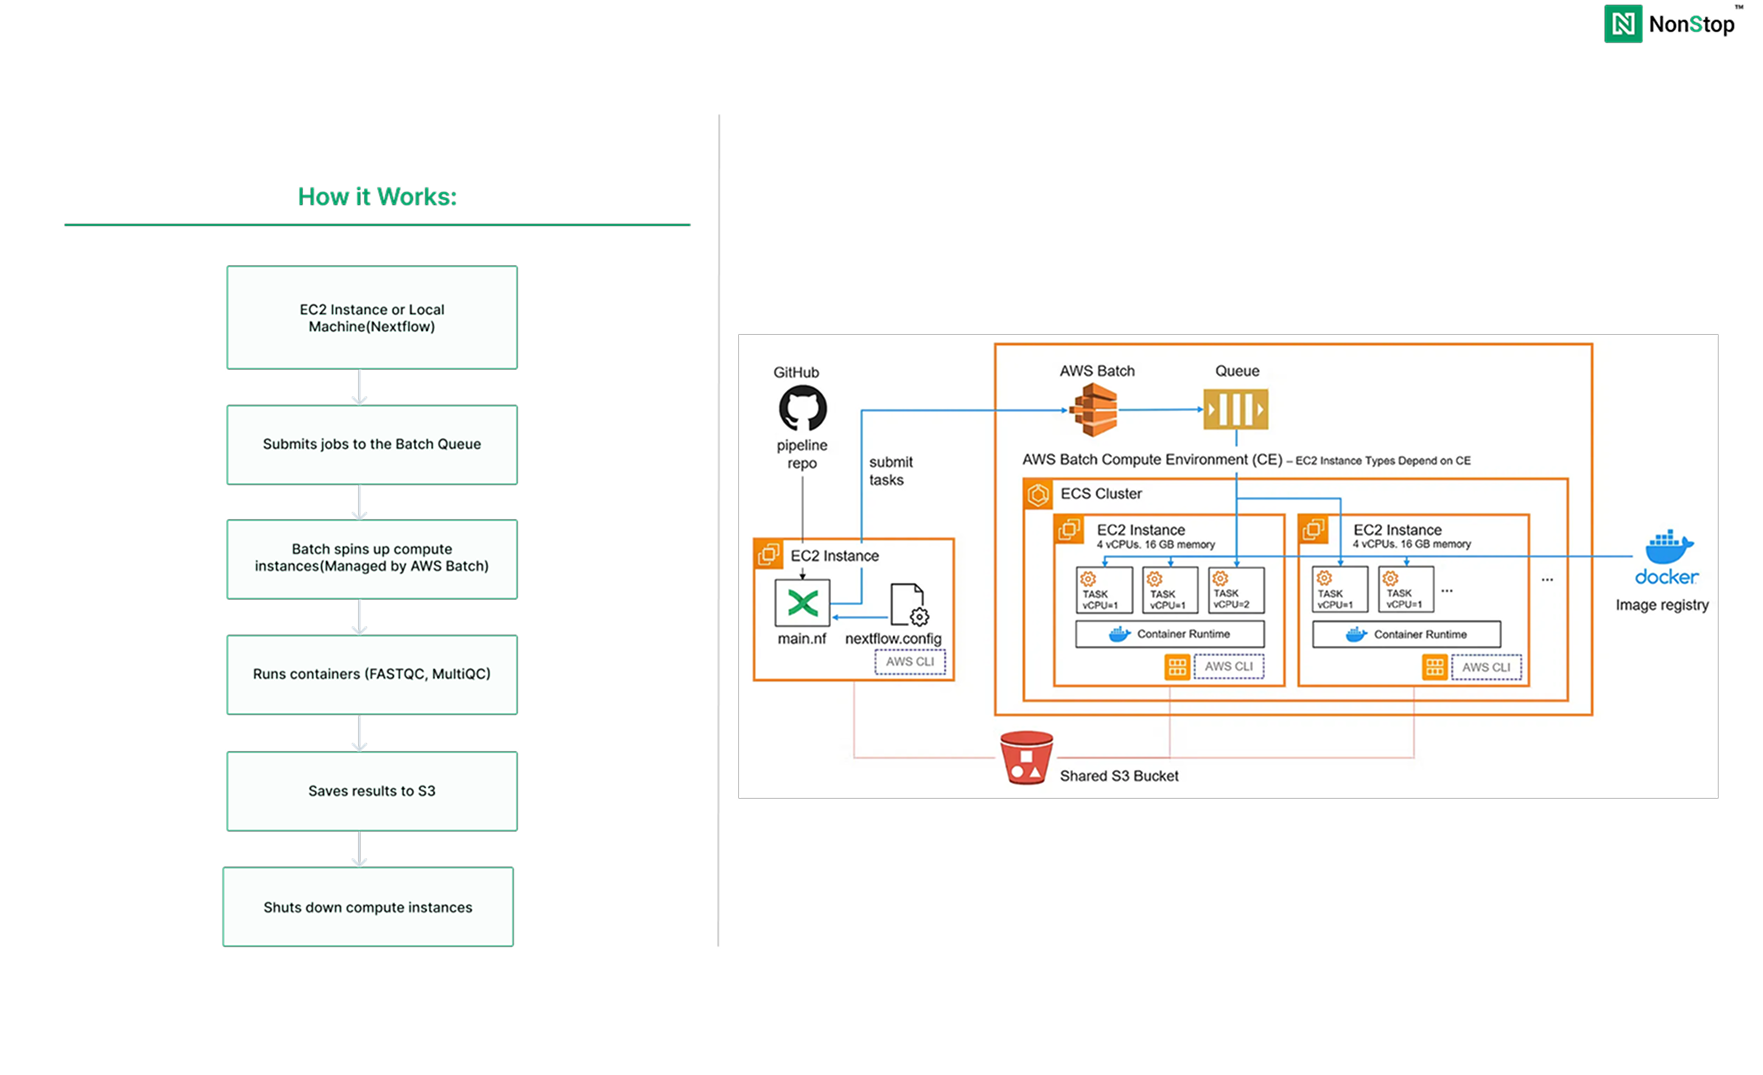
What We’re Building
The infrastructure will include:
- An Amazon S3 bucket for input data, results, and temporary work files.
- An AWS Batch compute environment that provides the worker capacity.
- An AWS Batch job queue that routes work to available compute resources.
- An Amazon EC2 instance that runs the Nextflow coordinator.
- AWS Batch-managed infrastructure for job scheduling, scaling, and execution.
Phase 1: Building the Infrastructure
Step 1: Create an S3 Bucket
1. Open the S3 Console
- Open the AWS Console.
- Navigate to Amazon S3.
- Select Create bucket.
2. Configure the Bucket
-
Bucket name:
nextflow-demo-yourname— the name must be globally unique. - Select the AWS Region nearest to your workload or users.
- Keep the remaining settings at their defaults unless your organization requires different security settings.
- Select Create bucket.
3. Create the Required Folders
Create the following folders inside the bucket:
inputs/results/work/
4. Upload the Input Data
- Open the
inputs/folder. - Select Upload.
- Add the FASTQ input file.
- Complete the upload.
Step 2: Create IAM Roles
Two IAM roles are required: one for the EC2 coordinator instance and another for the AWS Batch compute environment.
Role 1: EC2 Instance Role
1. Open the IAM Console
- Open the AWS Console.
- Navigate to IAM.
- Select Roles.
- Select Create role.
2. Select the Trusted Entity
- Select AWS service.
- Select EC2.
- Select Next.
3. Attach the Required Policies
For this demonstration, attach the following policies:
AmazonS3FullAccessAWSBatchFullAccessAmazonECS_FullAccess
Security note: For production environments, follow the principle of least privilege. Replace broad managed policies such as
AmazonS3FullAccesswith custom policies that grant access only to the required bucket, queue, job definitions, and related resources.
4. Name and Create the Role
- Role name:
NextflowEC2Role - Select Create role.
Step 3: Create the AWS Batch Compute Environment
1. Open the AWS Batch Console
- Open AWS Batch.
- Navigate to Compute environments.
- Select Create.
- Select the Amazon EC2 compute option.
2. Select the Orchestration Type
- Select Managed.
3. Name the Compute Environment
- Compute environment name:
nextflow-compute
4. Configure the Service Role
- Select the option to create a new service role.
- AWS will create the required service role automatically.
5. Configure the Instance Role
- Select the Batch compute instance role configured for the compute environment.
- For example:
BatchComputeInstanceRole - Select Next.
6. Configure Capacity
Adjust these values according to your expected workloads and budget.
- Provisioning model: On-Demand or Spot
- Minimum vCPUs: 0
- Desired vCPUs: 0
- Maximum vCPUs: 16
- Instance types: default_x86_64
- Allocation strategy: keep the default or select an option appropriate for the workload.
7. Configure Networking
- Select the required VPC.
- Select the appropriate subnets.
- Select a security group that permits the required outbound access.
For production systems, private subnets are generally preferable to exposing compute resources through public networking. Configure NAT, VPC endpoints, and security groups according to your organization’s network architecture.
8. Create the Environment
- Select Create compute environment.
- Wait until its status becomes VALID.
Step 4: Create the Job Queue
1. Open Job Queues
- Navigate to AWS Batch.
- Select Job queues.
- Select Create.
2. Configure the Queue
- Orchestration type: EC2
- Job queue name:
nextflow-queue - Priority: 1
- Connected compute environment:
nextflow-compute
3. Create the Queue
- Select Create job queue.
Step 5: Launch the EC2 Coordinator Instance
1. Open the EC2 Console
- Open the AWS Console.
- Navigate to Amazon EC2.
- Select Launch instance.
2. Configure the Instance
- Name:
nextflow-launcher - AMI: Amazon Linux
- Instance type: t3.small
- Select an existing key pair or create a new one.
3. Configure Networking
- Select the required VPC.
- Enable or disable a public IP according to your network design.
- Create or select an appropriate security group.
- If using SSH, restrict port 22 access to a trusted IP address.
4. Attach the IAM Instance Profile
- Open Advanced details.
- Under IAM instance profile, select
NextflowEC2Role.
5. Launch the Instance
- Select Launch instance.
Step 6: Install Nextflow
1. Connect to the EC2 Instance
The pipeline can also run from a local system with the AWS CLI installed and configured. For this guide, a dedicated EC2 instance is used as the Nextflow coordinator.
2. Install Java and Nextflow
sudo dnf install java -y

curl -s https://get.nextflow.io | bash
sudo mv nextflow /usr/local/bin/
sudo chmod +x /usr/local/bin/nextflow
nextflow -version
Phase 2: The Nextflow Pipeline

This example runs a bioinformatics quality-control workflow on genomic sequencing data. The example input file is available through the original download link.
What the Pipeline Does
- FASTQC: analyzes raw FASTQ sequencing data and generates quality-control reports. It checks read-quality scores, sequence duplication, GC content, and potential contamination.
- MultiQC: combines individual FASTQC reports into a single summary report, providing a consolidated view of data quality across samples.
FASTQC acts as the detailed inspector for individual files, while MultiQC acts as the reporting layer that summarizes the complete batch.
main.nf: Pipeline Definition
#!/usr/bin/env nextflow

nextflow.enable.dsl=2

params {
reads  = 's3://your-bucket-name/inputs/sample_data.fastq'
outdir = 's3://your-bucket-name/results'
}

process FASTQC {
container 'biocontainers/fastqc:v0.11.9_cv8'
publishDir "${params.outdir}/fastqc", mode: 'copy'

input:
path reads

output:
tuple path("*.html"), path("*_fastqc.zip")

script:
"""
echo "Running FASTQC on ${reads}"
fastqc ${reads}
echo "FASTQC completed for ${reads}"
"""

}

process MULTIQC {
container 'multiqc/multiqc:v1.14'
publishDir "${params.outdir}/multiqc", mode: 'copy'

input:
path fastqc_reports

output:
path "multiqc_report.html"
path "multiqc_data"

script:
"""
echo "Aggregating FASTQC reports with MultiQC"
multiqc .
echo "MultiQC report generated successfully"
"""

}

workflow {
reads_ch = Channel.fromPath(params.reads)
fastqc_reports_ch = FASTQC(reads_ch)
MULTIQC(fastqc_reports_ch.collect())
}nextflow.config: AWS Batch Configuration
plugins {
id 'nf-wave'
id 'nf-amazon'

}

wave {
enabled = true
}

fusion {
enabled = true
}

process {
executor = 'awsbatch'
queue    = ''

cpus   = 1
memory = '2 GB'

errorStrategy = {
    task.exitStatus in [130, 137, 143, 151] ? 'retry' : 'finish'
}

maxRetries = 3

withName: FASTQC {
    container = 'biocontainers/fastqc:v0.11.9_cv8'
}

withName: MULTIQC {
    container = 'multiqc/multiqc:v1.14'
}

}

aws {
region = 'us-east-1'

batch {
    volumes = '/fusion'
}

}

workDir = 's3:///work'
Important: Replace
<your-bucket-name>and<job-queue-name>with your actual S3 bucket and AWS Batch queue names. Update the AWS Region if your resources are not located inus-east-1.
Commit these files to your GitHub repository before running the pipeline from the EC2 coordinator.
Run the Pipeline
nextflow run https://github.com/username/repo-name.gitExample Output
N E X T F L O W  ~  version 24.04.4

Pulling username/repo-name ...
Downloaded from https://github.com/username/repo-name.git
Downloading plugin nf-wave@1.16.1
Downloading plugin nf-amazon@3.4.2
Launching `https://github.com/username/repo-name` [awesome_lichterman] DSL2
executor > awsbatch (2)
[a1/b2c3] process > FASTQC  [100%] 1 of 1 ✔
[e5/f6g7] process > MULTIQC [100%] 1 of 1 ✔
Completed at: 08-Jan-2025 10:30:15
Duration    : 3m 45s
CPU hours   : 0.4
Succeeded   : 2
What Happens During Execution
- Nextflow submits the pipeline processes to AWS Batch.
- AWS Batch provisions EC2 compute capacity when jobs enter the queue.
- FASTQC and MultiQC run inside containers.
- The generated reports and results are saved to Amazon S3.
- AWS Batch scales compute capacity down when the workload finishes.
Conclusion
You have now created a production-oriented Nextflow pipeline using AWS Batch.
With an S3 bucket, the required IAM roles, an AWS Batch compute environment, a job queue, and an EC2 coordinator instance, the system can:
- Scale compute resources according to workload.
- Handle job queuing and execution with minimal manual intervention.
- Store pipeline results directly in Amazon S3.
- Scale down compute resources when processing is complete.
The strength of this architecture is its relative simplicity. Nextflow coordinates the workflow, while AWS Batch manages compute provisioning, scheduling, and scaling.
What Makes This Architecture Powerful
AWS Batch reduces operational overhead. Teams do not need to manually patch worker servers, maintain a permanent compute cluster, or provision fixed capacity for every possible workload.
Nextflow manages workflow dependencies, retries, parallelization, and resume behavior. This allows pipeline developers to focus on defining what should be analyzed rather than managing every infrastructure detail.
Real-World Impact
The same architecture can scale from processing a single sample to processing thousands of samples.
The FASTQC and MultiQC pipeline shown here can be extended to support variant calling, RNA sequencing analysis, annotation workflows, and other multi-step computational pipelines.
Teams adopting this architecture may benefit from:
- Reduced infrastructure-management effort
- Lower compute costs when suitable Spot Instances are used
- Faster iteration on analysis pipelines
- Reproducible execution across development and cloud environments
Happy hosting!
